A wooden floor is something to cherish. It is a living and breathing product that you bring into your home and it adds warmth and character to your interior. It is also good to know that you don’t need to worry about it and that you can continue to live life as normal on your new wooden floor. Nevertheless, scratches or stains can still occur. Although Parky parquet gives you the upper hand when it comes to scratches and stains, if these do appear, it is quick and simple to repair your wooden floor.
The thinner the top layer, the smaller the indent
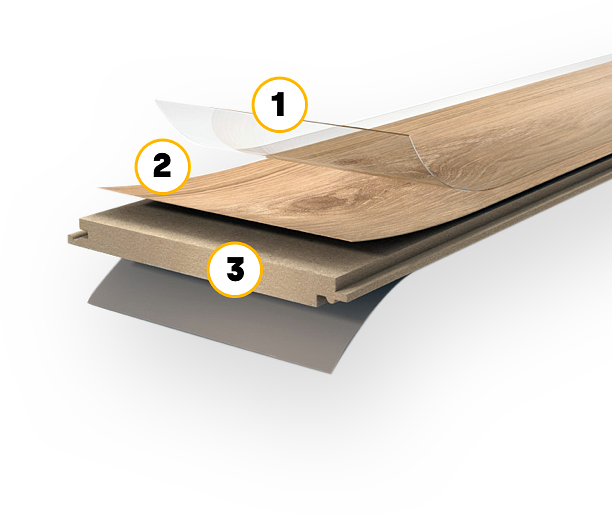
Avoiding scratches or stains on parquet flooring starts from the moment you choose your new wooden floor. That is why it is good to take a careful look at how your parquet flooring is made. For instance, each floorboard in a Parky floor is made from high-density fibre board (3). The thinner the wood on the top layer, the better your wooden floor resists impact. That is because the HDF is right under the top layer (2) and it is stronger than natural wood.
What happens if an object falls on your floor? The HDF board absorbs the shock and the indent does not go any deeper than the thickness of your top layer. In this way, your new floor is more resistant to heavy objects or stiletto heels.
Incredibly strong varnish that makes your parquet almost invincible
The genuine wooden top layer (2) of each Parky floorboard has 8 invisible layers of varnish (1). Thanks to those eight layers it is extremely strong, which means that your floor is able to withstand wear and tear and scratches, and the pores are protected against moisture and dirt. It also means you can choose a brushed finish without any worries so that you can feel all of the grains and details. The varnish also makes the floor easier to maintain than a solid parquet floor.
Repair minor scratches in a flash
At Parky, we make floors to live on, so go full steam ahead with real wood in your home. What if the unexpected happens? No problem! Parky Repair Pens are magic mark removers for veneer parquet. They come in boxes of one or two pens, depending on the shade of your floor.
How do you repair a scratch?
- Clean the area - First, clean the damaged area. By doing so, you will remove any loose fibres. Use a lint-free cloth.
- Retouch the colour - Use the colouring marker for this. It is important to work briskly and not to hold the pen for too long on the wood , as this can leave marks. You should always practice first on a piece of cardboard. Try do the colour retouching in small steps.
- Protect - You should always use a transparent varnish pen for this step. The aim of this step is to protect the damaged area from water and dirt. The protective layer also immediately restores the gloss level and makes the damage less visible under light. Move smoothly across the entire damaged area, including the edges. Try not to wipe too much as this leaves streaks and marks.

Repair small dents using wax
Parky Repair Wax lets you repair small dents in the varnish. The wax repairs the damage and protects the floor against moisture penetration. The Parky Repair Wax kit comes with seven wax blocks, a melting knife, and a spatula. You can read the full instructions here.
- Preparation - ensure that the floor you are going to repair is clean, dry, and free of dust.
- Choose a colour - choose the colour that matches your floor or combine various colours for the best result.
- Melt and mix - activate the wax melter by removing the protective cap, moving the yellow knob to the ‘ON’ position and pressing the blue button (for 10-15 seconds). Melt small pieces of the coloured blocks and mix them together.
- Fill - allow the wax mixture to flow into the damaged area, and ensure that it flows slightly over the area.
- Level off - use the sharp edges of the scraper to remove any excess material.
- Fine adjustment - to make fine adjustments, you can restore the wood pattern by using a pointed object to make light score marks. Fill these score marks with a dark colour. Smoothen it off using the flatter grooves on the scraper.
- Remove grease - use the grey abrasive sponge to remove grease from the area. The shiny part of the filled area will turn duller.
- Adjust the gloss level - you can adjust the gloss level using the green/white sponge. The green side increases the gloss and the white side makes it duller.

No need to worry if the damage is more serious
It is easy to replace a floorboard thanks to the handy click system. Ask your dealer for more information, or replace the floorboard yourself. You can find full instructions for our maintenance products, and tutorials for replacing a floorboard, on our downloads page.